Read From Database and Display on Webpage
NodeMCU is a low-cost open-source IoT platform that initially included firmware which runs on the ESP8266 Wi-Fi SoC from Espressif Systems, and hardware which was based on the ESP-12 module.
If you are getting started with IoT or microcontrollers in general, this development lath is a fierce competition to everything that yous'll come beyond, at least initially.
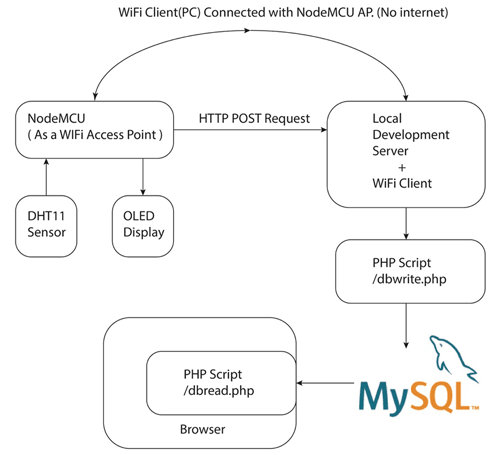
In this project, we will emphasize on looking at how to interface the NodeMCU development board with a local copy of MySQL DB using PHP.
Primarily,
- We'll exist edifice a NodeMCU Access Point that volition make a Mail service request with the sensor data to a PHP Script which will then insert the data to a Local Re-create Of MySQL Database.
- Nosotros'll be putting together a Spider web Page which will retrieve the latest reading from the MySQL Database and display it.
Note: The web folio in this context will not be fetching the data from the DB Asynchronously to avoid obvious complication, Nosotros'll have to reload page to see the latest information, we can automate the folio reload process by putting in a HTML5 Meta Tag:
<meta http-equiv="refresh" content="i">
Where the content attribute represents the interval in seconds of auto page refresh.
Secondarily, to spice things up on the hardware side,
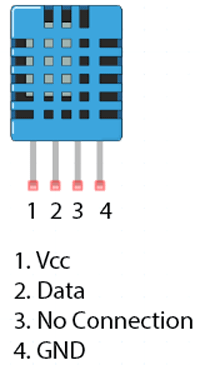
- We'll interface a DHT11-Temperature and Humidity Sensor which we'll be then stored in MySQL Database.
- We'll interface a 0.96 inch OLED Display( Commonly known equally SSD1306 OLED ) and display the readings.
Components Required
- NodeMCU
- DHT11 Sensor
- 0.96 inch I2C/IIC 128x64 OLED Display Module 4 Pin
- 10K 0.5W Resistor
- Breadboard
- Male to Male Jumper Wires x10
Excursion Diagram

As you tin can notice in the circuit illustration above, wiring upwardly things is adequately unproblematic.
1. Wiring up DHT11 to NodeMCU
- Start by placing the NodeMCU on to your breadboard, ensuring each side of the board is on a carve up side of the breadboard.
- Now, identify the sensor on to your breadboard too NodeMCU.
- Connect VCC pin on the sensor to the iii.3V pin on the NodeMCU and basis to footing.
- Also, connect Data pin on the sensor to D3 pin of the NodeMCU.
- Finally, we need to place a pull-upward resistor of 10KΩ between VCC and data line to keep it HIGH for proper advice between sensor and NodeMCU.
2. Wiring up the OLED to NoceMCU
- Connections are fairly uncomplicated. Get-go by connectingVCC pin to the 3.3V output on the NodeMCU and connectGNDto footing.
- Next, connect theSCL pin to the I2C clockD1 pin on your NodeMCU and connect theSDA pin to the I2C dataD2pin on your NodeMCU.
With that said our hardware is at present in place, note that nosotros won't go deep into the coding aspects of the hardware but the lawmaking will be commented enough to exist self- explanatory as our primary agenda is to understand MySQL and it'southward interface with NodeMCU.
Setting Up the Local Evolution Surroundings
Note: The merely reason we demand to manually setup a development environment is that we'll exist hosting and developing the project locally, no internet is needed once setup is complete.
1. Download XAMPP -> It is beingness advertised every bit beingness the most popular PHP evolution environment at the time of writing this commodity.
It is available for MacOS, Windows and Linux and the installation process volition exist like across every Os.
Download Link: https://www.apachefriends.org/index.html
2. Click on the setup file to start the click next until you lot are prompted to install the application.
Note: Make sure that all the components are installed, a few of which are non necessary for our project only could exist internally necessary for things to work smoothly.
3. Afterwards successful installation, run the XAMPP Control Panel from the desktop shortcut.
You'll be able to see something like below in the application window.
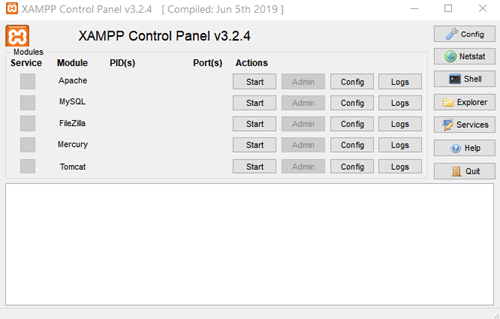
4. Run instances of Apache Server and MySQL by clicking on the start button in XAMPP Control Console.
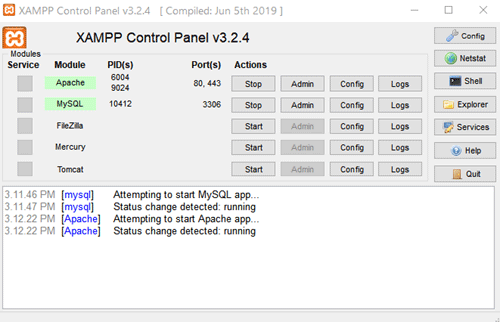
Access the phpMyAdmin Panel by clicking the Admin Push button located in the MySQL row of XAMPP Control Panel. Which will then open it in a browser tab.
five. Now, nosotros'll have access to the phpMyAdmin which can be used to create a new MySQL DB for our project.
A cursory on phpMyAdmin:
It is one of the about popular applications for MySQL database direction. It is a complimentary tool written in PHP. Through this software, you tin can create, modify, drop, delete, import and consign MySQL database tables. You tin run MySQL queries, optimize, repair and check tables, change collation and execute other database management commands.

Setting Up the MySQL Database using phpMyAdmin
i. Click on "New" in the sidebar located to the left of phpMyAdmin to create a new database.
You'll be prompted to make full in two fields:
1. Database proper name
2. Collation
Annotation: You tin can lookup for what'southward collation on the internet or just move on, the default collation is utfmb4_general_ci which volition work just fine for the project equally it supports everything we'll need.
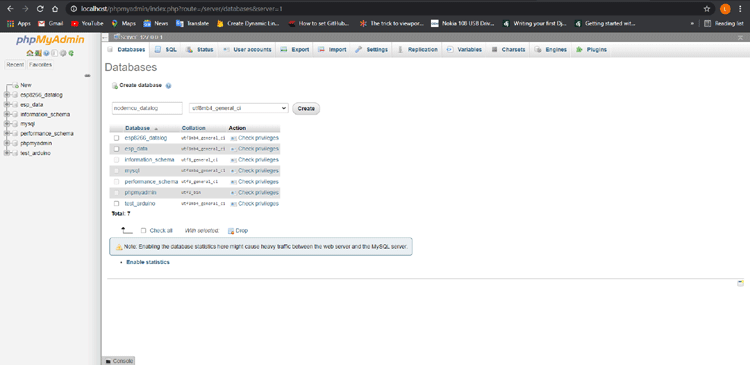
We have named our database "nodemcu_datalog" hither, which can exist renamed to any valid name.
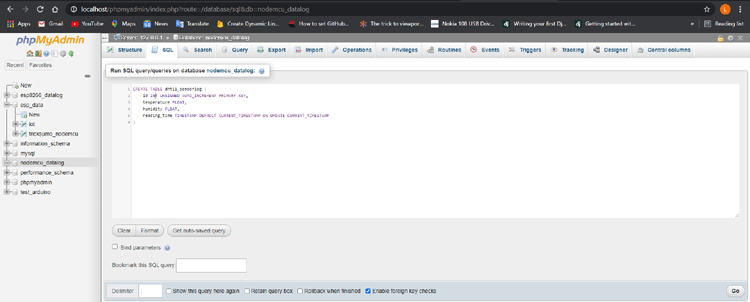
2. The next step will be to create a table in our database.
We'll proper name our table as "dht11_sensorlog".
We want our table to have four columns namely id, temperature, humidity and reading_time.
Click on the "SQL" tab from the tiptop bar to run a SQL query which will create a table for us, paste the query as beneath and click on the "Go" button at the bottom correct.
CREATE Tabular array dht11_sensorlog ( id INT UNSIGNED AUTO_INCREMENT Chief Cardinal, temperature Bladder, humidity FLOAT, reading_time TIMESTAMP DEFAULT CURRENT_TIMESTAMP ON UPDATE CURRENT_TIMESTAMP )
This volition create a table with specified fields:
Here, the ID is attributed with "AUTO_INCREMENT" Which means that every time new information arrives the ID is incremented by i as compared to the data in previous row.
Too the "PRIMARY_KEY" attribute means that every value in this column is unique.
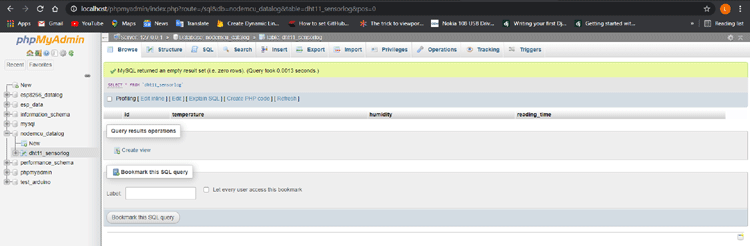
You can at present see the empty table with proper name of columns which will be filled with sensor data.
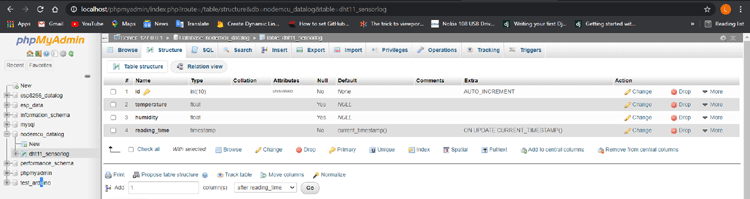
Clicking on the Construction tab in the tiptop bar will show you all the columns and their types every bit can exist seen beneath.
Also, every time nosotros insert some data to the table, "reading_time" field will be automatically filled with the timestamp of when data was inserted.
3. To terminate this off, we will create a database user and password.
1. Click on the "User accounts" tab from the superlative bar.
2. Click "Add user business relationship" and fill up login data as below.
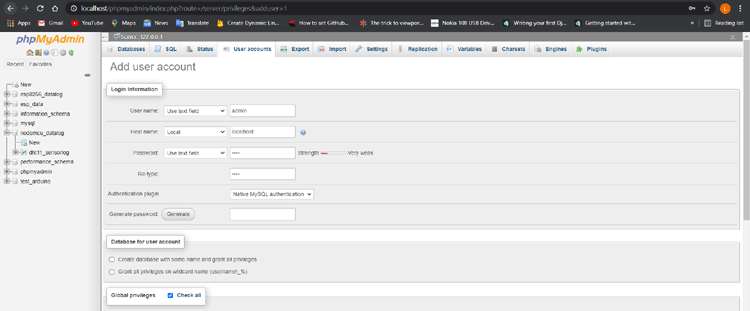
3. Click on "Go" at the bottom left which will successfully create a user.
With that said, we have completed setting up our database.
PHP Script to Insert Data into Database
Nosotros shall now start writing our php script to insert data into the MySQL DB.
To keep it unproblematic, we'll be creating a new text file equally "phpwrite.txt". And after, when we are done writing the code, we tin can change the extension of the file to "dbwrite.php"
It's time to get our hands muddied writing some PHP Lawmaking...
Hold on tight if yous've never been to PHP before, you can read through the comments 1 by one to get the idea.
Hither's what the code looks similar:
<?php // host = localhost considering database hosted on the same server where PHP files are hosted //everything prefixed with $ is a PHP variable $host = "localhost"; $dbname = "nodemcu_datalog"; // Database proper noun $username = "admin"; // Database username $password = "root"; // Database countersign // Establish connection to MySQL database, using the inbuilt MySQLi library. $conn = new mysqli($host, $username, $password, $dbname); // Check if connexion established successfully if ($conn->connect_error) { die("Connection failed: " . $conn->connect_error); } else { echo "Connected to mysql database. "; } //$_POST is a PHP Superglobal that assists united states of america to collect/access the information, that arrives in the form of a post request fabricated to this script. // If values sent by NodeMCU are not empty then insert into MySQL database table if(!empty($_POST['sendval']) && !empty($_POST['sendval2']) ){ // "sendval" and "sendval2" are query parameters accessed from the HTTP POST Asking made past the NodeMCU. $temperature = $_POST['sendval']; $humidity = $_POST['sendval2']; // Update your tablename here // A SQL query to insert data into table -> INSERT INTO table_name (col1, col2, ..., colN) VALUES (' " .$col1. " ', '".col2."', ..., ' ".colN." ') $sql = "INSERT INTO dht11_sensorlog (temperature, humidity) VALUES ('".$temperature."','".$humidity."')"; if ($conn->query($sql) === TRUE) { // If the query returns true, it means information technology ran successfully repeat "Values inserted in MySQL database table."; } else { echo "Error: " . $sql . "<br>" . $conn->error; } } // Shut MySQL connection $conn->close(); ?> PHP Script to Display Latest Reading
Now, that we are washed with writing to the database, we volition move on to reading from our MySQL DB and showing the latest reading on the screen.
Only this time, our PHP script will run on the server and return HTML which volition enables united states to visit the webpage and run into the latest reading.

Note: As discussed earlier, our web page will non exist fetching the data from the DB Asynchronously to avoid obvious complexity, We'll have to reload page to see the latest data, we can automate the folio reload process by putting in a HTML5 Meta Tag:
<meta http-equiv="refresh" content="i">
Where the content attribute represents interval in seconds of automobile page refresh.
Lawmaking:
<html> <head> <title>NodeMCU MySQL Datalog</championship> <meta http-equiv="refresh" content="1"> <!-- Refreshes the browser every one 2nd --> <!-- All the CSS styling for our Web Page, is inside the style tag below --> <fashion type="text/css"> * { margin: 0; padding: 0; } body { groundwork: url('/bg.jpeg') no-repeat centre middle; background-attachment: stock-still; background-size: cover; display: grid; align-items: center; justify-content: center; elevation: 100vh; font-family:Haettenschweiler, 'Arial Narrow Bold', sans-serif; } .container { box-shadow: 0 0 1rem 0 rgba(0, 0, 0, .two); border-radius: 1rem; position: relative; z-index: 1; background: inherit; overflow: hidden; text-align:center; padding: 5rem; font-size:40px; color: white; } .container:before { content: ""; position: accented; background: inherit; z-index: -1; tiptop: 0; left: 0; right: 0; bottom: 0; box-shadow: inset 0 0 2000px rgba(255, 255, 255, .5); filter: blur(10px); margin: -20px; } h1{ font-size: 40px; } p{ margin: 60px 0 0 0; } </style> </caput> <torso> <?php $host = "localhost"; // host = localhost because database hosted on the same server where PHP files are hosted $dbname = "nodemcu_datalog"; // Database name $username = "admin"; // Database username $password = "root"; // Database password // Establish connection to MySQL database $conn = new mysqli($host, $username, $password, $dbname); // Check if connection established successfully if ($conn->connect_error) { die("Connection failed: " . $conn->connect_error); } // Query the single latest entry from the database. -> SELECT * FROM table_name ORDER Past col_name DESC LIMIT 1 $sql = "SELECT * FROM dht11_sensorlog Gild By id DESC LIMIT i"; $result = $conn->query($sql); if ($result->num_rows > 0) { //Will come handy if nosotros later want to fetch multiple rows from the table while($row = $result->fetch_assoc()) { //fetch_assoc fetches a row from the outcome of our query iteratively for every row in our upshot. //Returning HTML from the server to testify on the webpage. echo '<div class="container">'; echo '<h1>NodeMCU Data Logging</h1>'; repeat '<p>'; echo ' <span form="dht-labels">Temperature = </bridge>'; echo ' <span id="temperature">'.$row["temperature"].' ℃</span>'; echo ' </p>'; echo '<p>'; echo ' <bridge class="hum dht-labels">Humidity = </bridge>'; echo ' <span id="humidity">'.$row["humidity"].' %</bridge>'; echo ' </p>'; echo '</div>'; } } else { echo "0 results"; } ?> </torso> </html> Breaking downwardly the SQL Query that fetches latest data
"SELECT * FROM dht11_sensorlog ORDER BY id DESC LIMIT 1"
SELECT * -> Used to select all the columns/fields from the database
FROM table_name -> The tabular array from which information is existence fetched
Order Past field_name DESC -> Retrieves data in a descending alphabetical or numerical order.
LIMIT some_number -> The number defines how many rows we want to retrieve from the consequence.
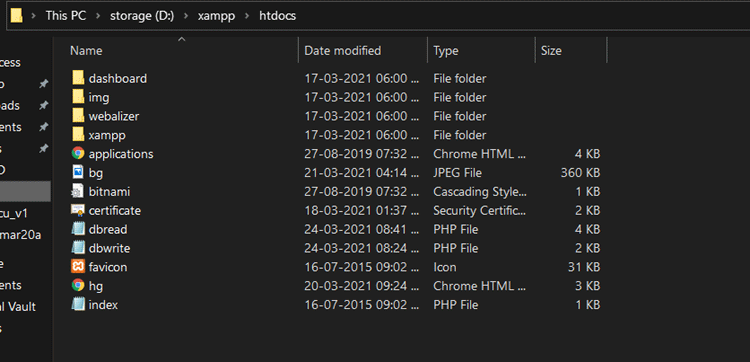
One time you lot take both the php scrips ready it's fourth dimension to alter the extension of both the files to.php if it is not already.
So yous'll take to move them into htdocs folder inside your main xampp installation folder, forth with all assets like images, etc.
NodeMCU Code
1. The sketch starts by including libraries:
#include "DHT.h" #include <Wire.h> #include <Adafruit_GFX.h> #include <Adafruit_SSD1306.h> #include <Adafruit_Sensor.h> #include <ESP8266WiFi.h> #include <ESP8266HTTPClient.h>
You must install a few of these libraries from the library manager present in Arduino IDE.
two. So all the global variable, pin definitions and necessary classes are instantiated:
//Initializations for DHT11 Sensor #define DHTPIN 0 #ascertain DHTTYPE DHT11 DHT dht(DHTPIN, DHTTYPE); float Temperature; float Humidity; //Terminate Of Initializations for DHT11 Sensor //Initializations for SSD1306 Sensor #define SCREEN_WIDTH 128 // OLED brandish width, in pixels #define SCREEN_HEIGHT 64 // OLED display summit, in pixels // Announcement for the SSD1306 brandish continued via I2C -> SDA + SCL Pins Adafruit_SSD1306 display(SCREEN_WIDTH, SCREEN_HEIGHT, &Wire, -i); //"&Wire" Declares the I2C Communication Protocol //"-ane" tells that the OLED display has no RESET Pin which is the instance with our OLED Display. //End Of Initializations for SSD1306 Sensor // Declare global variables which will be uploaded to server String sendval, sendval2, postData;
iii. The setup() part:
void setup() { dht.begin(); Serial.begin(115200); Serial.println("Communication Started \north\n"); filibuster(1000); pinMode(LED_BUILTIN, OUTPUT); // initialize built in led on the lath if(!display.begin(SSD1306_SWITCHCAPVCC, 0x3C)) { Serial.println(F("SSD1306 allocation failed")); for(;;); } delay(2000); brandish.clearDisplay(); brandish.setTextColor(WHITE); WiFi.mode(WIFI_AP); //name for the access betoken and eight graphic symbol countersign WiFi.softAP("NodeMCU", "nodemcur"); delay(200); while (WiFi.softAPgetStationNum() !=i){ //loop here while no AP is continued to this station Serial.impress("."); delay(100); } delay(500); The about of import snippet of code hither is to configure the NodeMCU as a WiFI AccessPoint:
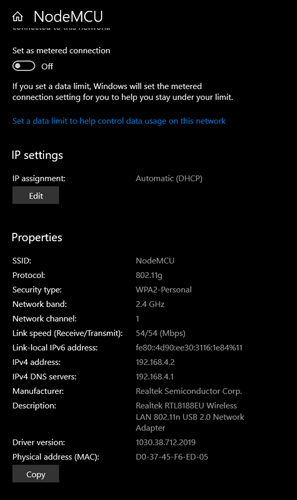
//configure the manner WiFi.mode(WIFI_AP); //proper name for the admission betoken and 8 character password WiFi.softAP("NodeMCU", "nodemcur"); Now, this WiFi AP tin can be accessed using the password defined. Once the client is continued to the AP, we need the IPv4 address of nodemcu at the customer side to allow make Mail requests.
Note: Once the AP is ready, connect the client device and extract the IPv4 address which is the actual IP address at which a Mail service request can be made.
The IPv4 accost here is: 192.168.iv.2.
4. The loop() function
void loop(){ //read temperature and humidity float temperature = dht.readTemperature(); float humidity = dht.readHumidity(); if(isnan(temperature) || isnan(humidity)){ Serial.println("Failed to read DHT11"); } else { Serial.print("Humidity: "); Serial.print(humidity); Series.print(" %\t"); Serial.print("Temperature: "); Serial.print(temperature); Serial.println(" *C"); filibuster(450); } // clear display brandish.clearDisplay(); // display temperature brandish.setTextSize(1); display.setCursor(0,0); display.print("Temperature: "); display.setTextSize(2); display.setCursor(0,10); display.print(temperature); display.impress(" "); display.setTextSize(1); display.cp437(true); brandish.write(167); display.setTextSize(2); display.impress("C"); // display humidity display.setTextSize(one); display.setCursor(0, 35); display.print("Humidity: "); display.setTextSize(2); display.setCursor(0, 45); brandish.print(humidity); display.print(" %"); display.display(); HTTPClient http; // http object of clas HTTPClient // Convert to float sendval = float(temperature); sendval2 = bladder(humidity); postData = "sendval=" + sendval + "&sendval2=" + sendval2; // We can post values to PHP files every bit example.com/dbwrite.php?name1=val1&name2=val2 // Hence created variable postData and stored our variables in it in desired format // Update Host URL here:- http.begin("http://192.168.4.ii/dbwrite.php"); // Connect to host where MySQL database is hosted http.addHeader("Content-Blazon", "application/x-www-course-urlencoded"); //Specify content-type header int httpCode = http.POST(postData); // Send POST request to php file and store server response code in variable named httpCode Series.println("Values are, sendval = " + sendval + " and sendval2 = "+sendval2 ); // if connection eatablished and then do this if (httpCode == 200) { Serial.println("Values uploaded successfully."); Series.println(httpCode); String webpage = http.getString(); // Get html webpage output and store it in a string Serial.println(webpage + "\north"); } else { // if failed to connect then return and restart Serial.println(httpCode); Series.println("Failed to upload values. \n"); http.stop(); render; } delay(200); digitalWrite(LED_BUILTIN, Depression); filibuster(200); digitalWrite(LED_BUILTIN, HIGH); } Code to brand a POST Asking to our Local Server:
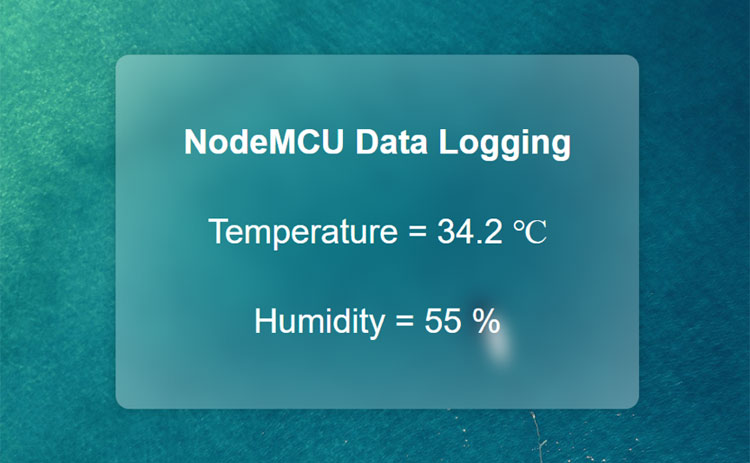
sendval = float(temperature); sendval2 = float(humidity); //Construct the information string postData = "sendval=" + sendval + "&sendval2=" + sendval2; // Connect to host where MySQL database is hosted, with IPv4 address of our NodeMCU http.begin("http://192.168.4.two/dbwrite.php"); //Specify content-type header http.addHeader("Content-Type", "awarding/x-world wide web-form-urlencoded"); // Transport POST asking to php file and store server response code in variable named httpCode int httpCode = http.POST(postData); With that said you can now visit the spider web page:
http://192.168.4.2/dbread.php
Annotation: dbread.php was the proper name of our webpage as we saved it in the "htdocs" folder. The filename can exist updated to any valid name, and thus the URL should vary.
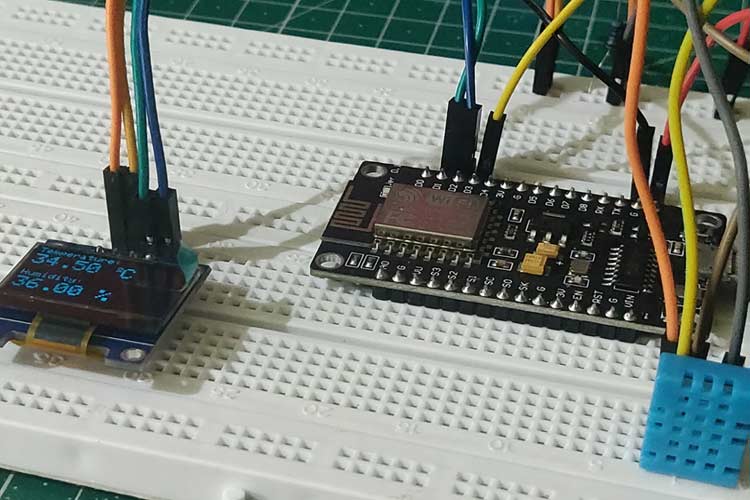
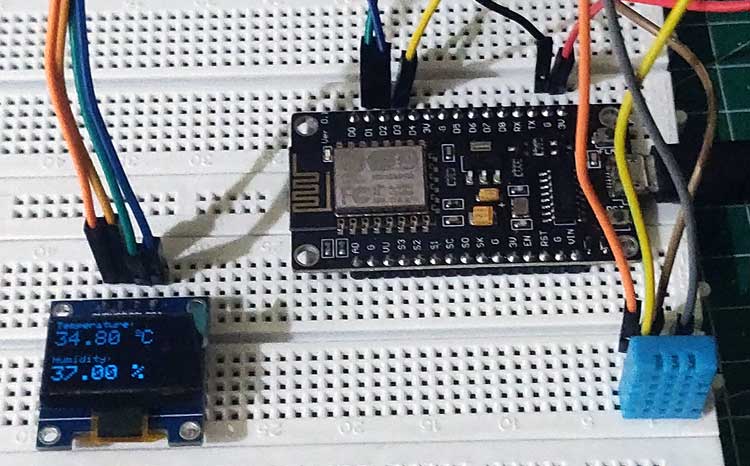
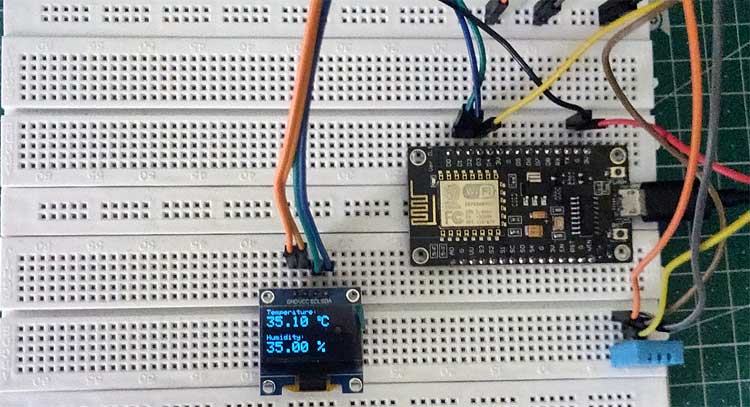
Hardware Images:
Code
#include "DHT.h"
#include <Wire.h>
#include <Adafruit_GFX.h>
#include <Adafruit_SSD1306.h>
#include <Adafruit_Sensor.h>
#include <ESP8266WiFi.h>
#include <ESP8266HTTPClient.h>
//Initialisations for DHT11 Sensor
#ascertain DHTPIN 0
#ascertain DHTTYPE DHT11
DHT dht(DHTPIN, DHTTYPE);
float Temperature;
float Humidity;
//End Of Initialisations for DHT11 Sensor
//Initialisations for SSD1306 Sensor
#define SCREEN_WIDTH 128 // OLED display width, in pixels
#define SCREEN_HEIGHT 64 // OLED brandish superlative, in pixels
// Declaration for the SSD1306 display connected via I2C -> SDA + SCL Pins
Adafruit_SSD1306 brandish(SCREEN_WIDTH, SCREEN_HEIGHT, &Wire, -1);
//"&Wire" Declares the I2C Advice Protocol
//"-one" tells that the OLED display has no RESET Pivot which is the case with our OLED Brandish.
//End Of Initialisations for SSD1306 Sensor
// Declare global variables which will be uploaded to server
String sendval, sendval2, postData;
void setup() {
dht.brainstorm();
Series.begin(115200);
Serial.println("Advice Started \due north\north");
delay(1000);
pinMode(LED_BUILTIN, OUTPUT); // initialize built in led on the board
if(!display.begin(SSD1306_SWITCHCAPVCC, 0x3C)) {
Serial.println(F("SSD1306 resource allotment failed"));
for(;;);
}
filibuster(2000);
display.clearDisplay();
display.setTextColor(WHITE);
WiFi.mode(WIFI_AP);
WiFi.softAP("NodeMCU", "nodemcur");
filibuster(200);
while (WiFi.softAPgetStationNum() !=1) { //loop here while no AP is connected to this station
Serial.print(".");
filibuster(100);
}
delay(500);
}
void loop(){
//read temperature and humidity
bladder temperature = dht.readTemperature();
bladder humidity = dht.readHumidity();
if(isnan(temperature) || isnan(humidity)){
Serial.println("Failed to read DHT11");
} else {
Serial.print("Humidity: ");
Serial.impress(humidity);
Serial.print(" %\t");
Serial.print("Temperature: ");
Series.impress(temperature);
Serial.println(" *C");
delay(450);
}
// articulate brandish
brandish.clearDisplay();
// brandish temperature
brandish.setTextSize(ane);
brandish.setCursor(0,0);
brandish.impress("Temperature: ");
brandish.setTextSize(two);
display.setCursor(0,x);
brandish.impress(temperature);
display.print(" ");
display.setTextSize(1);
display.cp437(true);
brandish.write(167);
brandish.setTextSize(2);
display.print("C");
// brandish humidity
brandish.setTextSize(i);
display.setCursor(0, 35);
display.impress("Humidity: ");
display.setTextSize(ii);
brandish.setCursor(0, 45);
display.print(humidity);
display.print(" %");
display.display();
HTTPClient http; // http object of clas HTTPClient
// Convert to float
sendval = float(temperature);
sendval2 = bladder(humidity);
postData = "sendval=" + sendval + "&sendval2=" + sendval2;
// Nosotros can post values to PHP files every bit example.com/dbwrite.php?name1=val1&name2=val2
// Hence created variable postData and stored our variables in it in desired format
// Update Host URL hither:-
http.begin("http://192.168.4.ii/dbwrite.php"); // Connect to host where MySQL database is hosted
http.addHeader("Content-Type", "application/x-www-class-urlencoded"); //Specify content-type header
int httpCode = http.POST(postData); // Send POST request to php file and store server response code in variable named httpCode
Serial.println("Values are, sendval = " + sendval + " and sendval2 = "+sendval2 );
// if connection eatablished then do this
if (httpCode == 200) { Serial.println("Values uploaded successfully."); Serial.println(httpCode);
String webpage = http.getString(); // Get html webpage output and store it in a string
Serial.println(webpage + "\n");
} else {
// if failed to connect so return and restart
Series.println(httpCode);
Series.println("Failed to upload values. \n");
http.terminate();
return;
}
delay(200);
digitalWrite(LED_BUILTIN, Low);
delay(200);
digitalWrite(LED_BUILTIN, HIGH);
}
Source: https://circuitdigest.com/microcontroller-projects/nodemcu-mysql-data-logging
Publicar un comentario for "Read From Database and Display on Webpage"